Voice Recording and Knowledge Base Project
Date: 2025 02-February 24
Key people: Mike Brower
Overview
The purpose of this project is to store and make searchable the knowledge of Mike Brower
We have:
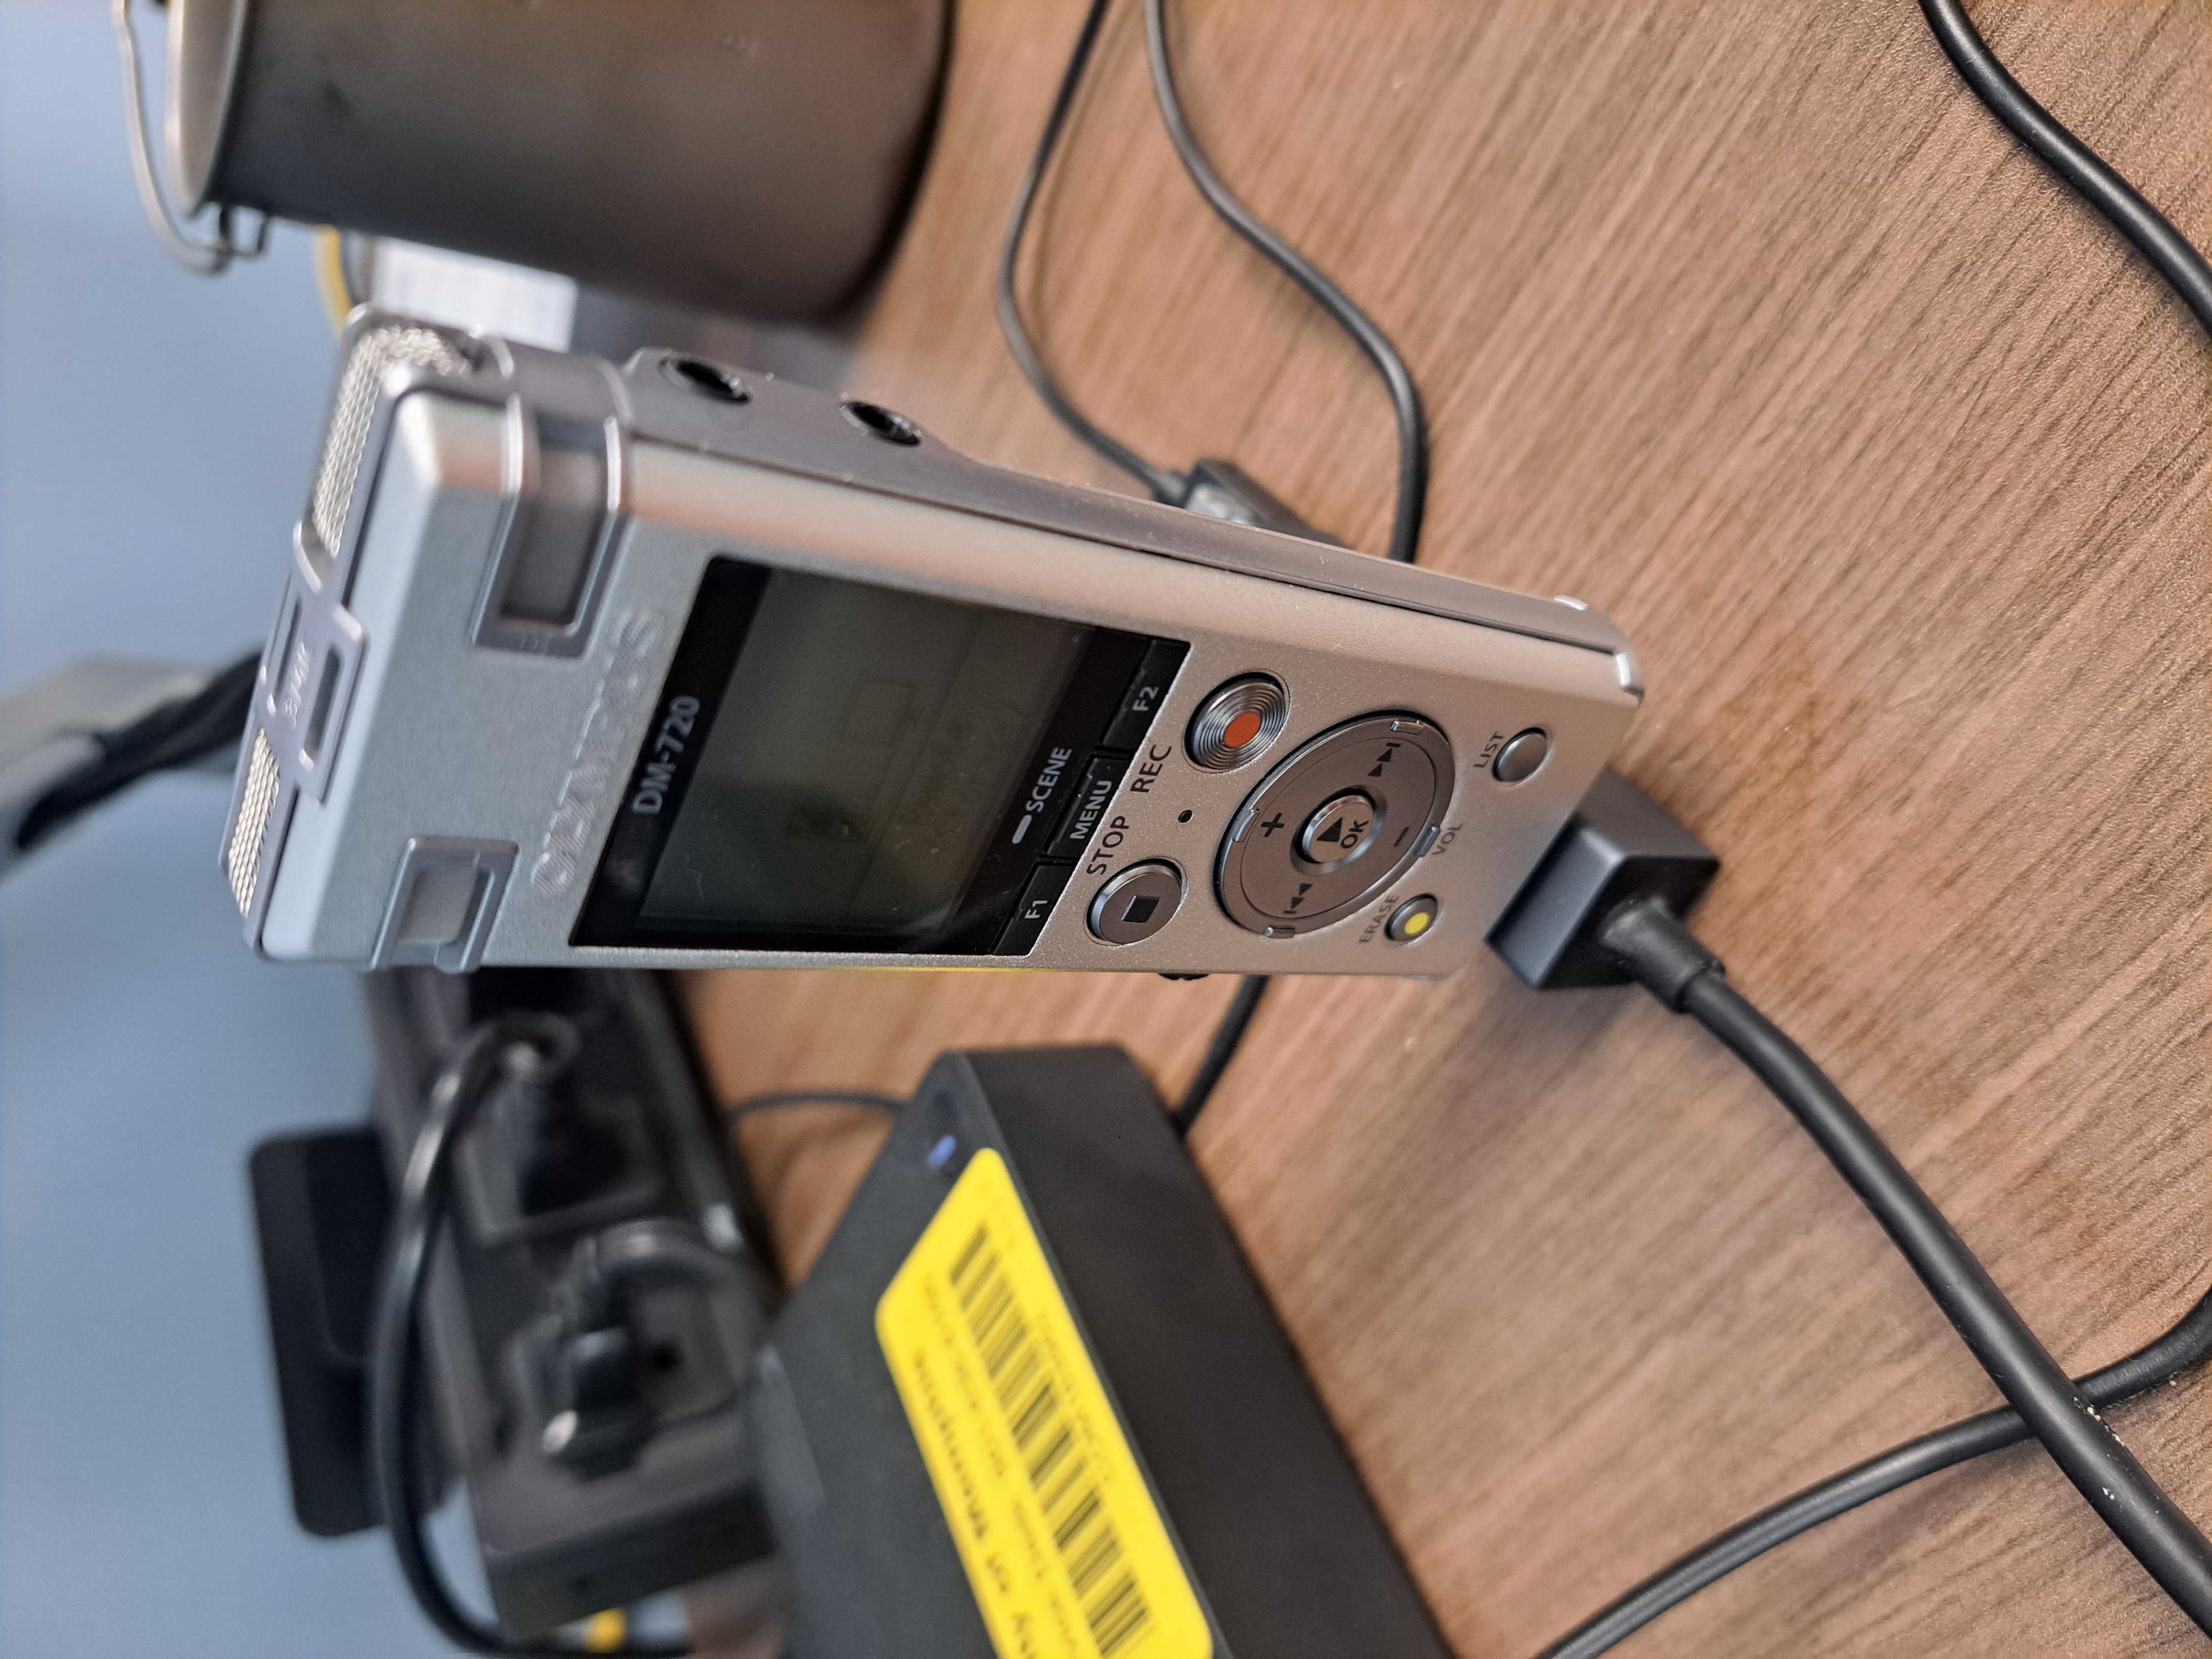
- Olympus DM-720 voice recorder
- Records MP3
- Reasonable noise cancellation
- Fairly easy to use
- Easy to plug in to computer
- A great reminder of how mediocre 2016 was in terms of technology. Let nostalgia die on this hill.
- Rechargeable battery (primo for 2016)
- Transcription in Microsoft Word, of all things. With a OneDrive account, 300 upload and transcription minutes are provided every month. That is 6 hours. Great.
- Upload (copy-paste) Transcript .doc to Co-Pilot, to generate markdown or latex.
- The final collected markdown file or latex pdf's can be uploaded to ChatGPT, which can be questioned.
- Are there more permanent long term options? The answer might well be to make a Digital Garden site from markdown, and see if ChatGPT can search the website. - this failed.
Device settings for Olympus DM-720:
- Rec Menu
- Rec Level: Auto (important)
- Rec Mode: MP3
- Zoom Mic: -3 (important)
- Low Cut Filter: On (important)
- Mic Select: Central Mic Off (important)
- VCVA: On
- V-Sync. Rec: Off (Starts automatically when a very loud sound happens)
- Timer Rec: off
- Rec Scene: Off (will override other settings)
- Play Menu
- Noise Cancel: High
- Voice Balancer: On
- Play mode: Recorder
- Play scene: Off
- Other:
- Hypothetically, the device can be used by the computer as an input microphone while in USB composite mode; alternatively, storage mode allows access to the files stored on the device. I don't see much purpose for AC mode compared to PC mode. Current: PC, Storage.
Work flow:
- Use voice recorder to capture audio (mp3 files).
- Plug the USB into the computer.
- Open Microsoft Word, and open the Transcribe tab
- Hit the "Upload Audio" button, and select the file(s) from the DM-720 hard drive
- Select "Add to document", and from the dropdown menu select "Just text".
- Files are uploaded to OneDrive. Example: OneDrive
- For this work document, you can:
- Save the file
- Ask for Markdown, given copy and paste the text to Co-Pilot or ChatGPT. Output should contain key words, tags, summary, and date (the date should come from the filename where possible).
- Ask for latex, to paste to Overleaf, with key words, tags, summary, and date (the date should come from the filename where possible).
- Upload zip of latex pdfs or markdown files to ChatGPT, and ask specific questions about information.
reference: Transcribe your recordings - Microsoft Support
Update:
I think the right approach will involve using Copilot inside of Word to convert the raw transcript into something more structured and queryable. Unfortunately my current version of Word does not support Copilot.
Welcome to Copilot in Word - Microsoft Support
https://www.intowindows.com/how-to-enable-copilot-in-office-word-on-windows-11-10-pc/
ChatGPT Analysis success:
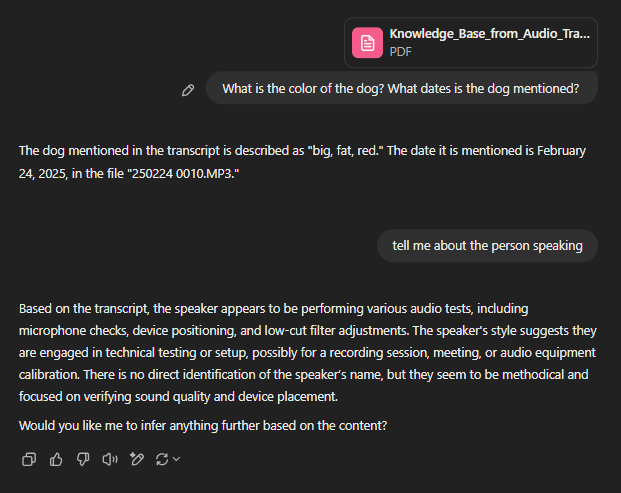
Markdown Attempt, Paste Word Transcripts into Co-Pilot
Offer markdown files for downloud that represent that raw trasncript, tags, and keywords. The goal is to generate a searchable knowledge base from this information, which comes from transcribed audio.
Output:
Transcribed Audio Files
Audio File: Your Recording.wav
Transcript:
00:00:00 Speaker 1: Check one, two.
00:00:03 Speaker 1: Or you open.
Tags: meeting, test
Keywords: Check, open
Audio File: 250224_0010.MP3
Transcript:
00:00:00 Speaker 1: All right, the quick brown fox jumped over the big, fat red dog.
Tags: test, phrase
Keywords: quick brown fox, dog
Audio File: 250224_0013.MP3
Transcript:
00:00:00 Speaker 1: OK, the device is.
00:00:03 Speaker 1: Across the table, facing away from, you're facing towards me.
00:00:08 Speaker 1: And now it's facing away from me
Tags: device, orientation
Keywords: table, facing
Audio File: 250224_0014.MP3
Transcript:
00:00:00 Speaker 1: All right. Previously I had. The low cut filter off.
00:00:05 Speaker 1: Now it is turned on and. I had the. Mic on and now it is. Off. So let's see.
00:00:13 Speaker 1: All right. The device is now cross the table from me. Facing away from me and it is now across the table from me, facing towards me.
Tags: device, filter, mic
Keywords: low cut filter, mic, table
Audio File: Your Recording 1.wav
Transcript:
00:00:00 Speaker 1: Mic. Check one, two.
00:00:02 Speaker 1: Hey is this working?
Tags: test, mic
Keywords: mic, check, working
What is the subject matter?
Co-Pilot:
The subject matter of the transcripts seems to be a combination of audio equipment testing and recording checks. Specifically:
- "Your Recording.wav" and "Your Recording 1.wav" both appear to be mic checks to ensure the microphone is functioning correctly.
- "250224_0010.MP3" contains a test phrase commonly used to check sound quality and clarity.
- "250224_0013.MP3" and "250224_0014.MP3" both involve descriptions of the device orientation and testing the effect of a low cut filter on the recording.
Overall, it seems like these recordings are primarily focused on testing and adjusting audio recording equipment. Does this match what you were expecting?
Latex Attempt (Overleaf.com)
Generated by Co-Piot, with edits, after pasting in MS Word Transcipts.
\documentclass{article}
\usepackage[utf8]{inputenc}
\usepackage[margin=1in]
\title{Knowledge Base from Audio Transcript - Test, Latex}
\author{G. Clayton Bennett}
\date
\begin
\maketitle
% Section for "Your Recording.wav"
\section*{Your Recording.wav}
\textbf{Filename:} Your Recording.wav \
\textbf{Date:} Unknown \
\textbf{Tags:} Meeting, Recording \
\textbf{Keywords:} Check, Open \
\textbf{Subject Matter:} Meeting Audio \
\textbf{Transcript:}
\begin{quote}
00:00:00 Speaker 1 \
Check one, two. \
00:00:03 \
Or you open. \
\end{quote}
\textbf{Summary:} Speaker 1 performs an audio check during a meeting, confirming that the recording equipment is working.
% Section for "File 250224 0010.MP3"
\section*{File 250224 0010.MP3}
\textbf{Filename:} 250224 0010.MP3 \
\textbf{Date:} 24 February 2025 \
\textbf{Tags:} Audio Test, Example Sentence \
\textbf{Keywords:} Quick Brown Fox, Dog \
\textbf{Subject Matter:} Audio Sample \
\textbf{Transcript:}
\begin{quote}
All right, the quick brown fox jumped over the big, fat red dog. \
\end{quote}
\textbf{Summary:} The speaker provides an example sentence for audio testing purposes.
% Section for "File 250224 0013.MP3"
\section*{File 250224 0013.MP3}
\textbf{Filename:} 250224 0013.MP3 \
\textbf{Date:} 24 February 2025 \
\textbf{Tags:} Device Placement, Audio Test \
\textbf{Keywords:} Device, Table, Facing \
\textbf{Subject Matter:} Device Positioning \
\textbf{Transcript:}
\begin{quote}
00:00:00 Speaker 1 \
OK, the device is. \
00:00:03 Speaker 1 \
Across the table, facing away from, you're facing towards me. \
00:00:08 Speaker 1 \
And now it's facing away from me \
\end{quote}
\textbf{Summary:} Speaker 1 discusses the positioning and orientation of the device on the table.
% Section for "File 250224 0014.MP3"
\section*{File 250224 0014.MP3}
\textbf{Filename:} 250224 0014.MP3 \
\textbf{Date:} 24 February 2025 \
\textbf{Tags:} Low Cut Filter, Mic Test \
\textbf{Keywords:} Low Cut Filter, Mic, Table, Facing \
\textbf{Subject Matter:} Audio Filter and Device Positioning \
\textbf{Transcript:}
\begin{quote}
All right. Previously I had. The low cut filter off. \
Now it is turned on and. I had the. Mic on and now it is. Off. So let's see. \
All right. The device is now cross the table from me. \
Facing away from me and it is now across the table from me, facing towards me. \
I. Yeah. \
\end{quote}
\textbf{Summary:} The speaker discusses changes in the low cut filter and mic status, followed by observations about the device's position on the table.
% Section for "Your Recording 1.wav"
\section*{Your Recording 1.wav}
\textbf{Filename:} Your Recording 1.wav \
\textbf{Date:} Unknown \
\textbf{Tags:} Mic Check, Recording \
\textbf{Keywords:} Mic, Working \
\textbf{Subject Matter:} Mic Test \
\textbf{Transcript:}
\begin{quote}
Mic. Check one, two. \
Hey is this working? \
\end{quote}
\textbf{Summary:} The speaker performs a microphone check to confirm if it is working properly.
\end

Output:
![[Knowledge_Base_from_Audio_Transcript.pdf]]
Deep in the weeds, Co-Pilot Planning
Co-Pilot Plan:
Step 1: Transcribe the Audio Monologues
You can use transcription tools to convert your audio files into text. Some options include:
-
Otter.ai: Upload your audio files and let Otter transcribe them for you. It offers high accuracy and identifies different speakers.
-
Microsoft Word: Use the built-in transcription feature to transcribe your MP3 files. Go to the “Home” tab, click “Dictate,” and select “Transcribe.”
-
Rev: For higher accuracy, you can use Rev’s human-powered transcription services.
Step 2: Organize the Transcriptions
Once you have the transcriptions, organize them into a structured format. You can use tools like:
-
Microsoft OneNote: Create notebooks for different topics and sections for individual monologues.
-
Evernote: Use notebooks and tags to categorize your transcriptions.
Step 3: Create a Searchable Knowledge Base
You can create a searchable knowledge base using platforms like:
-
Microsoft SharePoint: Upload your transcriptions to SharePoint, where you can use metadata and search functionality to easily find specific information.
-
Confluence: Use Confluence to create pages and spaces for your transcriptions. It offers robust search capabilities.
Step 4: Enhance Searchability
To make your knowledge base more effective, consider these tips:
-
Use Tags and Keywords: Tag important terms and keywords in your transcriptions to improve search results.
-
Create an Index: Develop an index page with links to different sections of your knowledge base.
-
Summary and Highlights: Add summaries and highlights to each transcription to quickly grasp the main points.
By following these steps, you can transform your audio monologues into a comprehensive and easily searchable knowledge base. Let me know if you need further details on any specific step! # end Co-Pilot
Co-Pilot Plan 2
That sounds like an interesting project! Here’s a roadmap to help you create a characteristic chatbot using the raw transcripts:
Step 1: Transcribe the Audio Monologues
As discussed earlier, transcribe your audio files using tools like Otter.ai, Microsoft Word, or Rev. Ensure the transcriptions are accurate and organized.
Step 2: Organize and Annotate Transcripts
Organize your transcriptions into a structured format and annotate them with key concepts, keywords, and important phrases. This will help the chatbot understand the context and respond accurately.
Step 3: Train a Chatbot Model
You can use platforms like OpenAI’s GPT-3 or other chatbot frameworks to train your model. Here’s a basic outline of the process:
- Data Preparation: Prepare your transcriptions as training data. Ensure you have enough examples for the chatbot to learn from.
- Fine-Tuning: Fine-tune a pre-trained language model using your annotated transcripts. This step involves adjusting the model’s parameters to better suit your specific content.
- Natural Language Processing (NLP): Incorporate NLP techniques to help the chatbot understand and generate human-like responses. This includes parsing input, generating coherent responses, and maintaining context.
Step 4: Develop the Chatbot
Use a chatbot framework or development platform to build your chatbot. Some popular options include:
- Microsoft Bot Framework: A comprehensive platform for building and deploying chatbots.
- Dialogflow: Google’s NLP platform for building conversational interfaces.
- Rasa: An open-source framework for building AI chatbots.
Step 5: Integrate and Deploy
Once your chatbot is developed and trained, integrate it into your desired platform (e.g., a website, messaging app, or internal tool). Deploy the chatbot and test its performance to ensure it meets your expectations.
Step 6: Continuous Improvement
Regularly update the chatbot with new data and feedback to improve its accuracy and relevance. Monitor its performance and make adjustments as needed.
Would you like more detailed information on any of these steps or recommendations for specific tools or frameworks?
Query:
For organizing transcriptions into a structured format and annotating them with key concepts, keywords, and important phrases, can an AI do this automatically?
Co-Pilot 3:
Yes, you can leverage AI to automate the organization and annotation of your transcriptions. Here are some tools and approaches that can help you achieve this:
1. Natural Language Processing (NLP) Tools
NLP tools can automatically analyze and annotate your transcripts with key concepts, keywords, and important phrases. Some popular options include:
- SpaCy: An open-source NLP library that can be used to process and analyze large text datasets.
- NLTK (Natural Language Toolkit): Another powerful open-source NLP library that provides various text processing libraries.
2. Text Analysis Platforms
There are platforms specifically designed for text analysis that can help you organize and annotate your transcripts:
- MonkeyLearn: An easy-to-use text analysis platform that offers keyword extraction, entity recognition, and more. You can train custom models to suit your specific needs.
- Clarabridge: A text analytics platform that provides sentiment analysis, entity recognition, and other NLP capabilities.
3. Custom AI Models
If you prefer a more tailored approach, you can train custom AI models to perform the organization and annotation tasks. Platforms like TensorFlow and PyTorch can be used to build and train these models.
4. Pre-trained Models
Pre-trained language models like GPT-3 can be fine-tuned for your specific use case. You can use these models to process your transcripts and identify key concepts, keywords, and important phrases.
Workflow Example:
- Transcription: Transcribe your audio files using tools like Otter.ai or Microsoft Word.
- Upload Transcripts: Upload your transcriptions to a text analysis platform or use an NLP tool.
- Automatic Annotation: Use the platform's capabilities to automatically extract key concepts, keywords, and important phrases.
- Organize Data: Structure the annotated data into a searchable knowledge base using tools like SharePoint or Confluence.
By using these AI tools and platforms, you can significantly streamline the process of organizing and annotating your transcriptions. If you need further guidance on any specific tool or approach, feel free to ask!